Showing posts with label dollhouse miniature food. Show all posts

Thursday, June 14, 2018

Miniature Bean Enchiladas, Omelets, WIP Burritos, and WIP Dishes With Queso Dip

Hello crafters!

I'm so excited to finally post some more new minis that I'm working on!

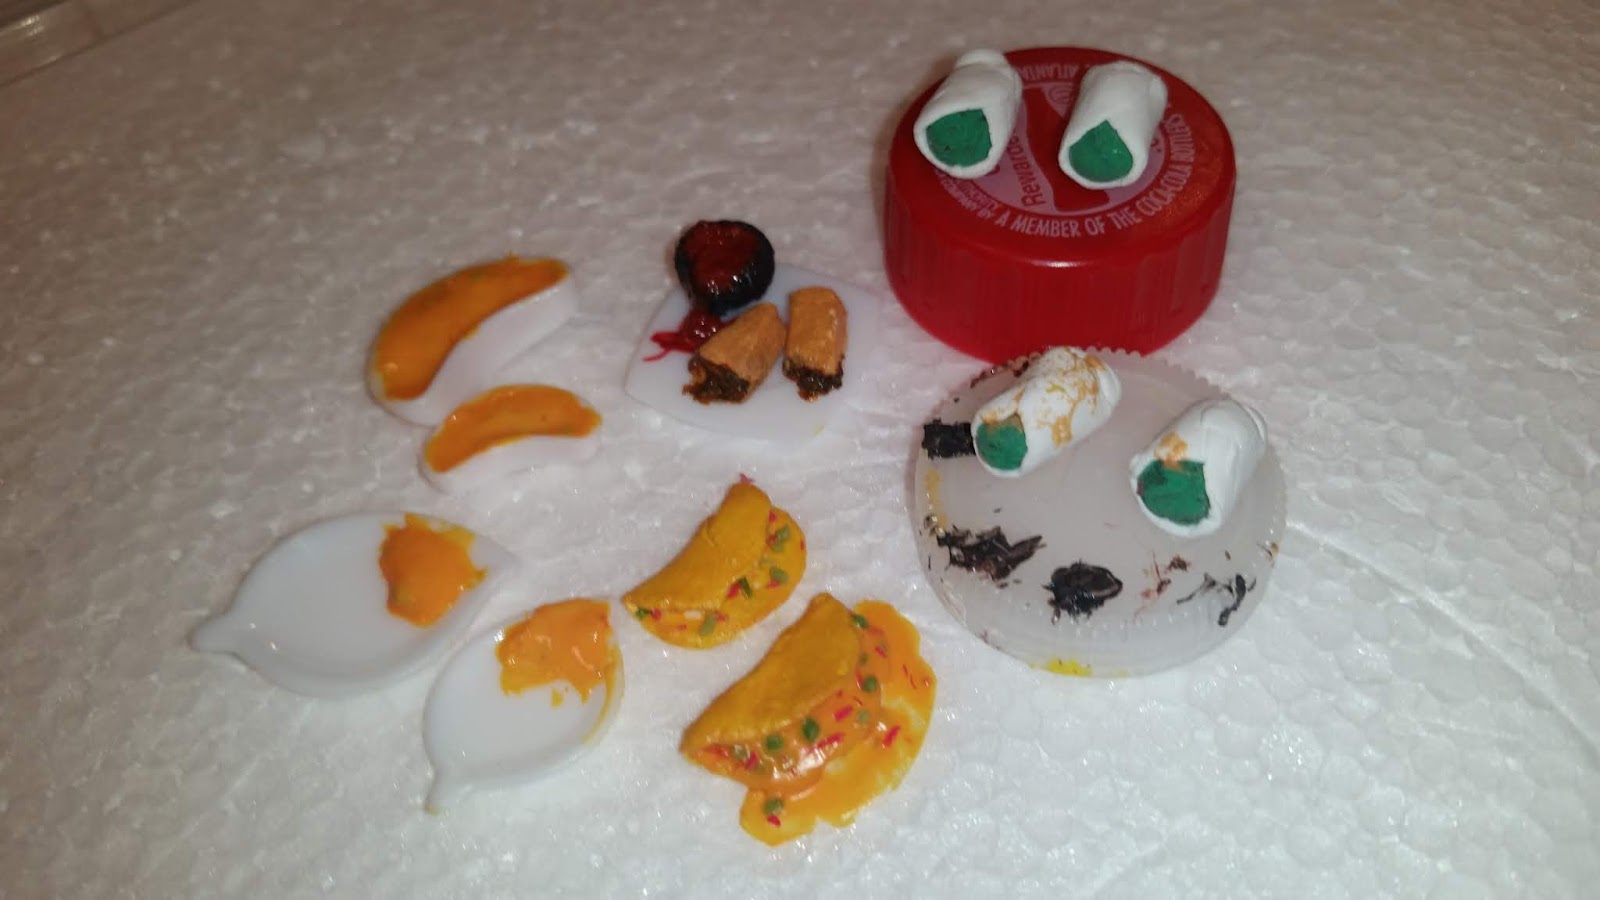
First off, on the right side of the photos shown below, are some beautiful burritos in progress! To make them, I wrapped a bit of white air-dry clay around some extra scrap green clay. It seemed like a better idea than making the actual ingredients and waisting majority of the items inside since I normally paint the outside of the mini anyways.

Next to the in-progress burritos are two bean enchiladas. In reality, the two enchiladas are actually just two beige pieces of scrap clay that I trimmed in an enchilada shape. To start transforming the two pieces, I mixed brown, yellow, orange, red, and white Puffy Paint to create cooked-bread colored paint. Then, I used a paintbrush to brush both pieces with the bread colored Puffy Paint mixture. While waiting for the pieces to dry, I cut up a piece of brown scrap clay into several small pieces & mixed the pieces with a mixture of red, black, and brown Puffy Paint. Doing this created a mixture that looked very similar to a bean mixture oozing out of an enchilada. Finally, I applied the mixture onto the end of both enchiladas.


Right in front of the bean enchiladas and next to the WIP burritos are some delicious omelets! Being my first ever time creating miniature omelets, I think they turned out pretty well! First, just like the enchiladas, I painted the omelets to give them a yellow-ish cooked look. Next, I cut a piece of green & red scrap clay into several small pieces. After that, on the first omelet, I used a bit of Tacky Glue to attach a few of the cut up pieces to give the omelet some color & look like seasonings. Then, I mixed Tacky Glue with orange, red & yellow Puffy Paint to create a cheesy looking mixture. Finally, I spread the mixture onto the inside of the second omelet and added a few of the extra scrap clay pieces on top.

The final minis-in-progress in the photos below are two bowls of queso dip and two plates with a bit of queso dip on the side. At the moment, I'm still working on the other minis to go along with the queso dip. I'll be posting photos of the finished dishes with queso dip & the finished burritos soon!

I hope you liked these tasty inedible minis!


Until next time,
- Cat

Tuesday, May 15, 2018

Marshmallow Roasting Prep Board

Hello crafters!

After a few weeks of crafting a ton, I'm super excited to finally post another new mini creation of mine!

Recently, I finished creating a beautiful Marshmallow Roasting Prep Board. It was actually a pretty interesting type of prep board to try considering I had never tried to make miniature sticks. I'm pretty happy with the final result.

To create the sticks, I gathered two toothpicks along with glue, and 3 brown markers, each a different shade of brown. First, I cut both toothpicks in half. Next, I cut off the toothpick tips on 3 of the toothpick halves. Then, I used a light brown marker to color all 3 pieces. After that, I colored the 3 toothpick halves lightly with a medium brown marker & a dark brown marker. Then, I glued the toothpick tips onto the already-colored toothpick halves. After a few minutes, once the glue had dried enough, I colored the tips in the same sequence that I colored the toothpick halves. Once I finished adding the tips, the miniature sticks were completed!

After I had finished making the miniature sticks for the prep board, I started working on the marshmallows! The marshmallows were a lot easier to create. First, I gathered some white air-dry clay. Next, I rolled a small piece of white clay into a ball. Then, I pressed the ball down just a touch & shaped it enough to form a marshmallow look & shape. After that, and once I added the marshmallows onto the sticks, I mixed a small bit of black Puffy Paint with brown Puffy Paint to create a dark brown color. Finally, I used a toothpick to spread a super light coat of the dark brown Puffy Paint onto the marshmallows on the sticks to give a 'Cooked Marshmallow" look.

I really love the final result! What do you think?


Until next time,
- Cat

Sunday, March 4, 2018

Dollhouse Miniature S'mores inspired Cake

Hello crafters!

"Ahh, a nice summer evening at the beach! So relaxing, but a sweet treat would just make it so much better!" said Barbie.  If that's what your dolls are also thinking, don't fear! Sweets are finally here!

Lately, I've been working on a variety of new cakes & have been trying to see how unusual, while still realistic, I can make them. Whenever I saw this weekend's challenge, Beach Crafts on the app, Crafty Amino, it looked so fun that I just had to try making a cake inspired by the beach!

After hours of thinking, I thought of the perfect idea! A campfire at the beach inspired cake. Which is what brought me to making a delicious miniature s'mores cake!

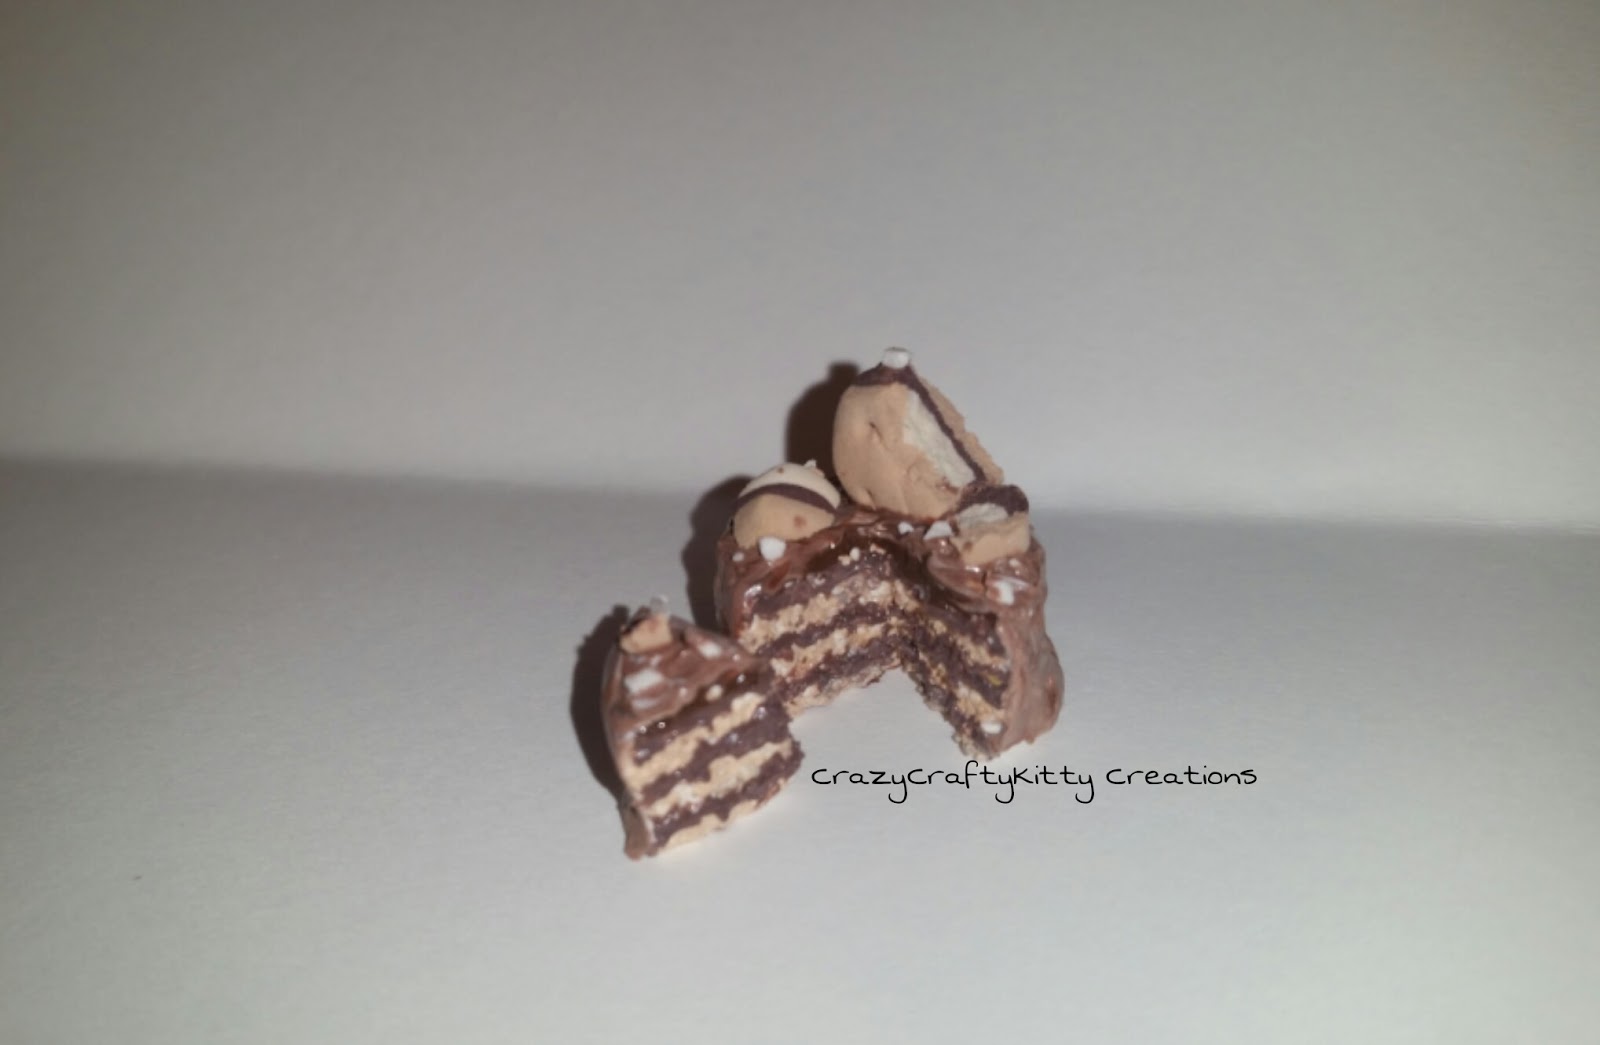
Inside the cake are 3 layers of graham cracker and 3 layers of chocolate. Next, we go to the outside of the cake where there is some delicious chocolate marshmallow frosting. Finally, to top it all off, I added 4 pieces of a broken up s'more on top with a few marshmallow sprinkles! Or, if we translate this into craft language . . .

To make the cake, I used white air-dry clay. Recently I made a large batch of plain white cakes so whenever I have time, I could decorate them. To get the colors, I used black, yellow, white, orange, and red Puffy paint along with white simulation cream. Once I had mixed the colors perfectly to get a graham-cracker-beige color, melted-marshmallow-white color, and a chocolate-brown color, I started painting the cake. I painted the inside layers to look like graham cracker & chocolate. Next, I used a toothpick to frost the cake with chocolate icing. I slightly swirled a bit of the graham cracker color and white marshmallow paint on areas of the frosting to make it look like a chocolate marshmallow frosting. Finally, I used an extra s'more which I had made a while ago, broke it into four different pieces, and placed the pieces on the cake. I also broke up a few pieces of white clay and sprinkled it on the top to look like marshmallow sprinkles.

Voila! A perfect sweet treat for a campfire at the beach! I hope you like it!


Friday, February 23, 2018

Delicious Mini Brownies With Chocolate Sprinkles

Hello crafters!

Today I'm super excited to post these adorable mini chocolate sprinkle brownies that I made a few weeks ago!

I used white air dry clay to create them. I had made them by adding white clay into the little ceramic dish & shaping a separate piece of white clay into a square. Next, I mixed a few Puffy Paint colors with sun catcher paints to make a thin chocolate brown paint. Then, I used a toothpick to paint the brownies. I flaked the inside of the brownies & the brownie on the side using the same toothpick that I used to paint them so the inside would be fully brown instead of white. After that, I sprinkled chopped pieces of chocolate colored clay on top of the brownies to look like sprinkles. Finally, I used a needle tool to add lines on the top of the brownies to look like if they were being cut into separate brownie squares.

Well, I hope you like these delicious brownies!


Tuesday, February 6, 2018

Miniature Icy Snow Cake

Hello crafters!

This weekend on the app, Crafty Amino, there was a super cool snow day crafts challenge. Was super fun, but for some reason, it was pretty hard for me to come up with a craft idea this challenge. Luckily, I finally came up with an idea. A few ideas actually, but let's focus on this craft for now!

Due to hurting my finger, It took a few extra hours to make this craft and sadly does not have as much detail as I had wanted.

Anyways, I'm super excited to show you all this brand new icy snow cake I just finished making! The cake has beautiful while icing on it, whipped cream on top, snowy sprinkles, and an ice crown! First, I made the cake out of white clay, cut out the cake piece, and flaked the inside of the cake and cake piece. Next, I made the white icing by mixing white and silver glitter Puffy Paint with a bit of white Simulation cream. Then, I spread the icing on the cake and cake piece. After that, I added a few decorations on top. I was also testing a new project to see if I could pour liquid glue into a cupcake mold and, once it was dry, take it out and use it as the bottom of a cupcake. I had ended up trying to take out the glue before it was dry and since it didn't finish drying, the piece of glue looked almost like a crown. Finally, I trimmed the piece up a bit and glued it on top of the cake

I hope you like it!


Miniature Sandpaper Nachos

Hello crafters!

Time for another craft which I made a few weeks ago! And in this post, we want to welcome our guest . . . . . Sandpaper Nachos! Have to admit, not my best craft, but It works and has a similar look to what I was going for.

The day that I was making this craft I really was not in the mood for working with clay, so I was trying to think of an alternative. I wanted to make some nachos and was trying to come up with an idea of how to make the chips without using clay. I saw some sandpaper which made me wonder if it would work as chips.

First, I got a piece of sandpaper and cut the paper up into tiny triangle pieces. Next, I glued the pieces to a mini plate. After that, I mixed orange and yellow Puffy Paint to make the perfect cheesy color. Finally, I added the cheesy Puffy Paint color onto the plate next to the nacho chips and added a few dashes of the cheese onto the sandpaper chips.

I hope you like it!


Tuesday, January 30, 2018

Mini Ham & Cheese Sandwiches

Hello crafters!

I recently made these delicious miniature cheese and ham sandwiches. Was planning to post them awhile ago but had forgotten!

To make these, I got 6 pieces of beige clay & shaped each of them into a triangle shape. I did the same thing with 3 pieces of orange clay & pink clay around the same size. Afterwards, I placed one of the triangle pink pieces on top of one of the beige pieces of clay. Then, I placed an orange piece on top & added another beige piece on top.  Finally, I just shaped the sandwich a little more.
,
Well, that was pretty much it!  I hope you like it!


Dollhouse Miniature Cherry Cheesecake

Hello crafters!

If you read my last post, then you might remember that I had made my mini orange cake during the same time that I created my pastel rainbow cake.  During that night & the day before I had created a few other cakes too!

So here with us today is my new mini cherry cheesecake!! It seems like my dolls keep asking me for cheesecakes, but actually, I tend to have a ton of almost dry, chunky red paint left after making some new crafts and decide to use it for cheesecakes! 

Anyways, I made the cheesecake by adding white clay into a bottom cheesecake mold. Once I took it out, I painted the bottom piece with a beige color. After that, I added beads to the red Puffy Paint mix & mixed everything together to color the beads.  Finally, I added the mixture on top of the cheesecake bottom & dripped red suncatcher paint on top of it to make it shiny.

I hope you like it!


Monday, January 29, 2018

Miniature Orange Cake

Hello crafters!

Today I'm super excited to post a brand new orange cake that I made earlier this weekend!

I had actually made it while making my rainbow pastel cake during Friday night.  Haven't had time to post this cake or a lot of other minis that I've recently made due to crafting so much lately.

Anyways, onto this delicious orange cake!  I had made it out of air dry clay.  First, I just shaped the white clay, and cut out a cake piece.  Next, I flaked the cake.  After that, I started making the frosting for the cake by mixing white Simulation cream, a mix of orange sun catcher paint & pink Puffy Paint, and some white Puffy Paint.  Finally, I added some yellow sprinkles & an orange decoration piece on top!  The yellow sprinkles actually seem to look like orange sprinkles on the cake, but it works pretty well!

I hope you like it!


Thursday, January 25, 2018

White Vanilla Strawberry Frosting Miniature Cake

Hello crafters!

After another late night of crafting, I'm super excited to finally post a new craft!  Been super busy crafting the last few days, so hopefully, I can soon find enough time to post the majority of these crafts soon!

Anyways, this is one of my newest miniature 1:12 scale cakes!  It's supposed to be a white vanilla cake with fluffy strawberry icing & hearts on top!

To make this cake, I just used white clay, shaped it into a cake, and cut out the cake piece.  Next, I just flaked the cake with my needle tool.  Then, I started to work on creating the frosting!  For the frosting, I had mixed pink Puffy Paint and white Simulation Cream together & let it sit for a few minutes to become a bit thicker.  It ended up to be the perfect color, so I used my needle tool & toothpick to paint it onto the cake.  Finally, I sprinkled some heart decorations on top!

Well, I hope you liked it!

Sunday, January 14, 2018

Aladdin Inspired MIniature Cake

Hello crafters!

This weekend there was an Arabian Nights-themed craft challenge on the app, Crafty Amino, so I just had to participate! The first idea that came to my mind was the Disney movie Aladdin. I really wanted to challenge myself for this challenge so I decided to make an Aladdin inspired miniature cake!

I made a 2 layer light blue frosting cake with some golden chocolate frosting on parts of the blue frosting. I also added Princess Jasmine on a magic carpet & a genie lamp in front. Finally, I added some gold and silver diamond, and silver star decorations to represent the night.

 Started working on it during Friday afternoon and just finished it a few minutes ago. The cake is about 3 centimeters tall (a little taller than an inch), which made it much harder to add so much detail for something so small.

 I hope you like it!


Wednesday, January 10, 2018

Strawberry Confetti Cake

Good morning crafters!

The glitter unicorn has come to visit & has brought her brand new strawberry glitter confetti cake with tons of toppings!  I now wondering what a glitter unicorn would look like.  Maybe a glitter unicorn will have to be my next project!

But for now, I just finished this brand new strawberry glitter confetti cake a few days ago!  It took a few hours, but the sparkly glitter is so pretty!

I just used a heart foam piece for the base.  Next, I mixed pink, white and confetti glitter Puffy Paint for the icing.  I used a toothpick to spread on the icing.  After that, I added a few quick cake toppings on top, including strawberries, grapes, raspberries, and a few other toppings that I'm not exactly sure of what they technically are.  But, lets assume they are just decorations made out of doll cake fondant.

It was a pretty simple cake to make.  This was actually one of the first crafts that I used my new confetti glitter Puffy Paint on.  So excited to see what other crafts this beautiful confetti glitter might work with!

I hope you like it!


Tick Tock Black & White Clock Cake

Hello crafters!

So happy to finally post this brand new miniature cake which I started working on Saturday and finished it Sunday.  I was actually specifically making it for a Tick Tock crafts weekend challenge on the app, Crafty Amino.  A clock cake had automatically came into my mind along with the idea of Alice In Wonderland after I saw the challenge.  So that's what I decided to make!

I had originally drawn out a whole extravagant Alice in Wonderland, Clock cake idea.  It didn't work out as planned, so instead I stuck to a simple black & white clock cake.

First, I rolled out a ball of white clay, flattened it, and cut out a cake piece.  Next, I used a needle to flake the inside of the cake & cake piece.  It took about 30 minutes to flake, but turned out pretty impressive.  Once I had flaked the cake, I used a permanent black marker around the bottom inside the cake & cake piece to look like and Oreo cookie bottom crust.  Then, I used a mixture of Puffy Paint & Simulation cream on the outside of the cake.  After the first coat dried, I used the same black marker to draw on the clock numbers.  Then, I added another coat of whipped cream icing.

After that, I used black, confetti glitter and white Puffy Paint to paint the clock hands.  I also tried using it to give an almost 3D black & white effect in the middle of the cake.  The confetti glitter was mixed with Black Puffy Paint, so it might not be too visible in the pictures, but don't worry!  It is there!  Finally, I added 4 checker cookies to top off the cake!  The checker cookies were actually checker pieces I had leftover from when I made my Cheshire cat awhile ago.

Anyways, I hope you like it!


Tuesday, January 9, 2018

Red Velvet Cake Slices

Hello again crafters!

Here with us now are two delicious pieces of miniature red velvet cake slices!

I made them back during November or December, but haven't been able to post them since these adorable cake slices have been canceling their last few interviews due to being snowed in.  But luckily they finally came to tell us all about themselves!

These were actually a bit easier to make than I expected.  First, I just got out a piece of red velvet colored clay & split it into two pieces.  Next, I used my fingers to shape both pieces into a triangle cake slice shape.  Then, I got out some white clay, flattened it, and cut out 2 perfectly straight strips of clay.  After that, I carefully placed one of the white strips in the middle on both sides of one of the cake slices.  I did the same thing with the other cake slice.

Then, I used a needle (toothpick works just as well) to flake both sides of both cake slices.  After that, I used a toothpick to slightly texture & flatten the white icing.  Finally, I glued the pieces to a mini plate!

Took awhile to flake, but it was really worth it!

I hope you like it!


Blueberry, Strawberry, Raspberry & Orange Fruit Cake

Hello crafters!

I'm super excited to finally post this delicious mini fruit cake cake, flavored with blueberry, strawberry, raspberry, and orange!

I'm pretty sure I could do much better now on this type of mini cake.  This was actually one of my first miniature cakes that I made a few years ago.

I had actually it made out of polymer clay.  Once it was cooked, I used acrylic paints to give it the pretty colors.  After that, I coated the cake.

Not exactly sure what flavors the cake was supposed to be, but I'm guessing it might've been blueberry, strawberry, raspberry & orange,

Well, I hope you like it!


Thursday, January 4, 2018

WIP Mardi Gras King Cake

Hello crafters!

Although New Years has passed so soon, there are still many holidays to craft for!   So at the moment, I'm working on some brand new Valentines & Mardi Gras minis!

After a giant micro bead avalanche earlier last night, a ton of my organized micro beads got mixed up.  Instead of picking them up & trying to organize them, I decided to try making a new mini food with them! 

Didn't feel like working with clay yesterday, even though I had wanted to make a Mardi Gras inspired cake.  So I decided to try making it out of the micro beads that had dropped during the avalanche.  I ended up making a mixture of micro beads, Puffy Paint, and glue! I mixed them all together and waited a few minutes. Once the mixture had dried enough to shape, I used a toothpick, & straw to shape the mixture into a Mardi Gras King Cake Shape!

It's not finished yet, planning to finish it soon!  Still have to paint the cake a brown bread color & add green, gold & purple sprinkles.  It is turning out pretty good so far.  And don't worry, none of the micro beads were injured in the avalanche!

I hope you like it!


Wednesday, January 3, 2018

Hot Dog In A Dog Bun!

Hello crafters!

A few weeks ago while looking at pictures of real food, I saw these adorable hot dogs in a bun, with the bun being decorated to look like an adorable little puppy face!

I just couldn't resist making my own version of these in mini form. So, that's exactly what I did!

 Let's start off with making the hot dog & bun!
First, I used beige clay to start working on the buns.  I just rolled the clay out & shaped it into a circle shape. Next, I rolled out the hot dog. I mixed black clay with red clay to make a dark maroon colored clay. Then, I used my hands to roll it back and forth into a perfect hot dog shape. After that, I glued the hot dog into the middle of the bun and folded it over. Then, I used a toothpick to shape out the ears. After that, I used a toothpick, dipped it in black Puffy Paint, and used it to dot the eyes and nose. Finally, I had used red & yellow Puffy Paint, spread it inside the bun & glued the hot dog bun to the plate.

Onto the fries & ketchup!

To make the fries, I just rolled out some fried yellow colored clay i had mixed awhile ago. Next, I placed it on a flat surface and flattened it to the thickness I wanted. After that, I just sliced them into the perfect french fry shape & mini size!  Then, I glued each of them to the place. Finally, I added a bit more red Puffy Paint to look like ketchup!

I hope you like it!


Pink Icing Square Star Cake

Hello crafters!

A few weeks ago I started working on a new delicious yummy strawberry pink icing heart cake.  Took a little while to make the cake, but it ended up turning out adorable!

To make it, I started off by using a square piece of foam for the base.  First, I frosted it with some delicious looking pink frosting.  I had used a mixture of Caulk and pink Puffy Paint to make the frosting.  Next, I slightly used a toothpick to make it look a bit whipped & textured.  Finally, I had decided to try adding a few toppings on the top of the cake.  I used some pretty star decorations, which are actually supposed to be used for nail art, to decorate the top.  I added the silver & purple stars by using a toothpick to pick them up and place them in the perfect places.

Was so fun to create!  I hope you like it!


Bread Loaf In A Clay Basket

Hello crafters!

A few months ago I was working on making some beautiful mini clay baskets & a loaf of mini bread.  Been meaning to post it for the last few months but haven't had time.

Well luckily I finally found the time!  So now onto how I created the basket & bread!

It took awhile to make.  First, I just got a big ball of light yellow-beige clay, and tried to shape it around my fingers.  I just basically kept shaping it until it seemed like it was the perfect shape.  Then, I used a bottle top and a toothpick to make almost a ring looking texture around it.  After that, I used a toothpick to try and shape the top of the basket a bit.  Finally, I had brushed the basket with chalk trying to make it look like more of a basket color.  Instead it turned out to almost look like a burnt basket, but it still looks pretty good.

Now onto the bread loaf!

The bread loaf was actually easy to make.  I just used some beige clay, shaped it into a similar shape of a loaf of french bread, and used a toothpick to add 3 small lines in the middle on the top of the loaf.   After that, I brushed it with chalk. Seems the dolls left the bread cooking a bit too long also!

I hope you like it!


Blueberry Peppermint Cake

Good morning crafters!

Never exactly finished posting every single holiday mini that I had made during the month of December, so throughout the rest of the week I will be posting the rest of my miniature holiday food!

Right now, I have a new delicious mini blueberry peppermint cake! She arrived a bit late to the interview due to being snowed in, but luckily she finally made it!

I had originally saw some pictures of beautiful blueberry cakes with white icing a few weeks ago.  After that, I was thinking to make a white cream icing blueberry cake.

To start making it, I used a thick circle piece of foam for the base of the cake.  Next, I just covered it with some pretty white clay.  Then, I used a toothpick to slightly put indents around the side to make it look more like icing.  After that, I got some blue clay, tore off a few pieces, and rolled them until they were the perfect shape and size.  I had then attached them to the top of the cake.  They aren't my best blueberries though, I had forgot to use a needle or toothpick to poke a hole into each blueberry.  But, they were good enough . . .

I was actually planning to leave it at just a blueberry & white icing cake.  But a few weeks later, I decided that it needed something else.  Then, I ended up adding blue sun catcher paint onto the top and sprinkling a few pieces of broken up blueberry peppermint sticks.

Was pretty fun to make.  I hope you like it!😀😀