Showing posts with label 1:12 scale dollhouse food. Show all posts

Thursday, June 14, 2018

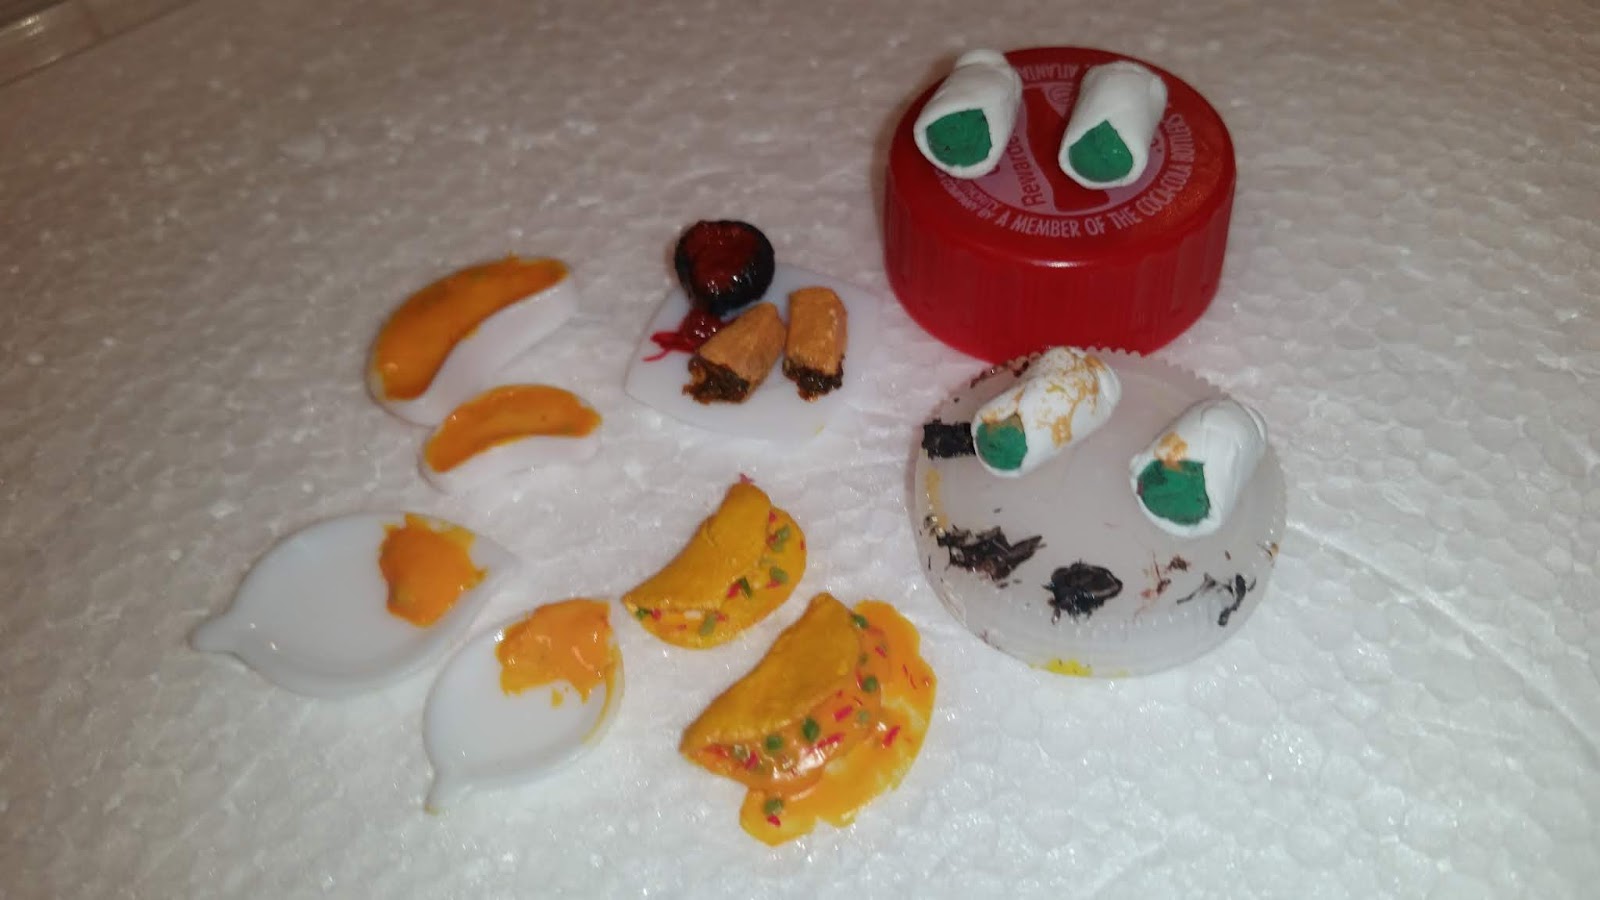
Miniature Bean Enchiladas, Omelets, WIP Burritos, and WIP Dishes With Queso Dip

Hello crafters!

I'm so excited to finally post some more new minis that I'm working on!

First off, on the right side of the photos shown below, are some beautiful burritos in progress! To make them, I wrapped a bit of white air-dry clay around some extra scrap green clay. It seemed like a better idea than making the actual ingredients and waisting majority of the items inside since I normally paint the outside of the mini anyways.

Next to the in-progress burritos are two bean enchiladas. In reality, the two enchiladas are actually just two beige pieces of scrap clay that I trimmed in an enchilada shape. To start transforming the two pieces, I mixed brown, yellow, orange, red, and white Puffy Paint to create cooked-bread colored paint. Then, I used a paintbrush to brush both pieces with the bread colored Puffy Paint mixture. While waiting for the pieces to dry, I cut up a piece of brown scrap clay into several small pieces & mixed the pieces with a mixture of red, black, and brown Puffy Paint. Doing this created a mixture that looked very similar to a bean mixture oozing out of an enchilada. Finally, I applied the mixture onto the end of both enchiladas.


Right in front of the bean enchiladas and next to the WIP burritos are some delicious omelets! Being my first ever time creating miniature omelets, I think they turned out pretty well! First, just like the enchiladas, I painted the omelets to give them a yellow-ish cooked look. Next, I cut a piece of green & red scrap clay into several small pieces. After that, on the first omelet, I used a bit of Tacky Glue to attach a few of the cut up pieces to give the omelet some color & look like seasonings. Then, I mixed Tacky Glue with orange, red & yellow Puffy Paint to create a cheesy looking mixture. Finally, I spread the mixture onto the inside of the second omelet and added a few of the extra scrap clay pieces on top.

The final minis-in-progress in the photos below are two bowls of queso dip and two plates with a bit of queso dip on the side. At the moment, I'm still working on the other minis to go along with the queso dip. I'll be posting photos of the finished dishes with queso dip & the finished burritos soon!

I hope you liked these tasty inedible minis!


Until next time,
- Cat

Friday, March 9, 2018

Miniature French Fries Made With Scrap Clay (Tutorial)

Hello crafters!

Normally, whenever I'm trying to make miniature french fries, I use a light yellow clay color and shape out each individual french fry. Due to not being able to work with clay for the past few days, I came up with a much quicker, easier way to make miniature french fries. Surprisingly, I actually like these french fries a little better than my normal ones. 

In this craft, I'm using scrap clay to make the mini french fries. If and when you have worked with air-dry clay for a few months, a few scrap pieces of clay that have accidentally dried might start to accumulate.  As a tip for any other crafters reading this, never throw anything away. Scrap pieces of clay, plastic containers, scrap pieces of fabric, paper with writing on part of it, etc. All types of things can amazingly be used to make cool, new things.

So after a long intro, it's finally time for the tutorial part of this post!

HOW TO MAKE MINIATURE FRENCH FRIES:

What You'll Need:
- Yellow french fry colored piece of scrap clay
- Scissors

First, I cut off two small rectangle-shaped pieces of clay.

Next, I vertically sliced both pieces in half, now turning the two slices of clay into four slices of clay.


After that, I horizontally cut all four of the pieces in half. Once I finished doing this, there were now eight small slices of clay, also known as eight adorable mini fries.


Finally, I glued the mini fries together on a miniature plate. I added some ketchup, mustard, and a hot dog in a bun on the side! 

I hope you liked this tutorial!

Saturday, November 4, 2017

Mini Plate of Sweet Snacks

Hello crafters!


 This weekend the app Crafty Amino posted a snacks crafts themed challenge, so I knew the perfect thing to post for the challenge! The first idea I had was to create a plate of many different snacks, so that is exactly what I did!

 Since I love most sweet & sugary snacks I decided to create a variety of snacks. It took awhile but turned out perfect! As you can see below, I created some delicious frosted berries, chocolate bars, peppermint candies, cotton candy puffs, strawberry marshmallows, and cinnamon sticks.


I`m Planning to make a tutorial on how to create peppermint candies and candy canes very soon. Anyways for now, I hope you like it!


Thursday, November 2, 2017

French Fries & Shrimp

Hello crafters!

Today I am so excited to show one of my newest creations, french fries and shrimp!

It took a few hours to make but was really worth it. I created the fries by cutting a square piece of yellow clay into long rectangles. I then created the shrimp by using some orange fried looking clay color, rolling it into a ball and slightly twisting the end. I then added a smaller ball of pale pink clay at the end and push my nail into it to make the shrimp tail.

After I finished the main parts, I just rolled a piece of white clay into a tall circular shape and painted the top with a maroon red color I made using red and black Puffy Paint. Now it looks almost like a bowl with sauce in it! Finally I added some delicious basil leaves on the side to fill in the small empty space.

This dish is just perfect for a 1:12 scale doll! I hope you like it!


Saturday, October 14, 2017

Peach Pecan Cake!

Hello crafters!

Today i`m super excited to show one of my newest cakes, a peach pecan cake!

 It was so much fun to create! I used calk mixed with orange paint to make the icing and topped it with two adorable little pecans. I love the realistic look so much! Going to have to make more cakes like this soon!:)

 Hope you like it!!!

Wednesday, October 11, 2017

Mini Spaghetti Taco!

Hello crafters!

I`m super excited to show you all one of my newest creations, a mini spaghetti taco inspired by ICarly! If you`ve ever watched the Nickelodeon show, ICarly, i`m sure you`ve heard of spaghetti tacos!

Recently a friend of mine challenged me to make a mini spaghetti taco, and I finally got to create one. It was really fun to make! First, I created the taco using clay by making a small circle of beige clay and folding it. Next, I cut up a piece of yellowish beige construction paper into small (but long) pieces. Then, I gathered the small pieces of paper, put them in a cup and added a little water to make the paper wet. A few seconds later I pulled the pieces of paper out of the water. Finally, I added a touch of glue inside the taco and put the crumbled up long & wet pieces of paper and stuck it to the glue. The hardest part was the clay, glue and wet paper ended up making a big mess. I`d recommend if trying it with air-dry clay, let the clay harden and dry first, unless you want a sticky wet mess!

Well, here are a few pictures of the mini spaghetti taco, along with a picture of the real one from the show. I hope you like it!


Sunday, September 10, 2017

Popcorn!

Good evening crafters!

If any dolls feel like relaxing, watching a movie and having a snack, then we have the perfect snack for all of you! What is it? It`s Popcorn!

How I made it:
It was super fun! First, I started off by getting a white piece of clay and shaping it to look like a popcorn container. Next, I rolled many small balls of light yellow clay, Then, I then attached all the popcorn balls together and added them to the top of the container I created. Finally, I used sun catcher paint to give the container some pretty red stripes. I also used black sun catcher paint to add a little symbol!

It is very tiny so it`s perfect for popcorn for 1:12 scale dolls! I hope you like it! 

Friday, September 8, 2017

My First Pumpkin!

Good afternoon crafters!

Today i`m super excited to show a pumpkin I recently made. It came out pretty good for my first pumpkin i`ve made,

How I made it:
First, I made the pumpkin orange colored clay by mixing a bit of orange clay with a  touch of green to make an orangey brown. Next, I rolled it into a ball and kept rolling it until it became the shape I wanted. I made the stem by mixing orange, green, and a small touch of black. Finally, I just textured the stem using a toothpick. The pumpkin is fully grown, ready to eat & finished!

I hope you like it!


Tuesday, September 5, 2017

Chocolate Chip Cookies!

Good morning crafters!

Today, i`m planning to share a delicious Chocolate Chip Cookie recipe! Though make sure to remember, it is only edible for dolls!

What you`ll need:

- Chocolate chips NOT edible, or known as brown clay
- Cookie dough NOT edible, can be known as beige clay

How I made it:

It was pretty easy. First, I mixed a touch of orange and white clay to make some beige clay, then rolled the beige clay into small balls. Next, I made some smaller balls using brown clay. Then, I added the smaller brown balls to the tops of the small beige balls. Finally, I slightly flattened the ball. Your chocolate chip cookies are finished!
My end result:


Hope your dolls enjoy them!


Thursday, August 17, 2017

Chocolate Heart Cake

A few nights ago I stayed up all night creating creating some new miniature cakes!

It took a few hours to finish all the cakes I started working on but I ended up finishing a pretty good amount of mini cakes!

Below i have a few pictures of one of my newest mini cakes! I have to admit it`s one of my favorites out of the cakes I made a few days ago. I used Puffy Paint and Calk for the chocolate icing and added some cute little chocolates as a topping on it.

Chocolate inside, chocolate icing and chocolate toppings. Sounds pretty delicious! *only edible for dolls!

I hope you like it!


Thursday, August 10, 2017

S'mores Prep Board

Ready to make some s'mores?

A few weeks ago I tried creating my first ever clay s'mores which turned out to be about 1:12 scale size. It was pretty fun & easy to make! While creating them I decided to make a s'mores prep board since any doll has to have a place and ingredients to make the s'mores

How I made it:
It was pretty easy. First, I got some light blue clay, sliced it into a rectangle and just shaped the edges a bit. I made the knife by just using gray clay and shaping it. Next, I got some leftover pink clay and shaped it into a bowl. Time for the ingredients! To make the marshmallows, I just got a small ball of white clay and shaped it a little to give it a fluffy marshmallow look & size. Then, I got some brown clay to use as the melted chocolate part. Finally, I created the graham cracker by cutting out a square of beige clay and then using a needle or toothpick to make 5 holes in it. Put the fake chocolate and marshmallows between two graham crackers and the miniature s'mores are finished!

Hope you like it!