Thursday, June 14, 2018

Miniature Bean Enchiladas, Omelets, WIP Burritos, and WIP Dishes With Queso Dip

Hello crafters!

I'm so excited to finally post some more new minis that I'm working on!

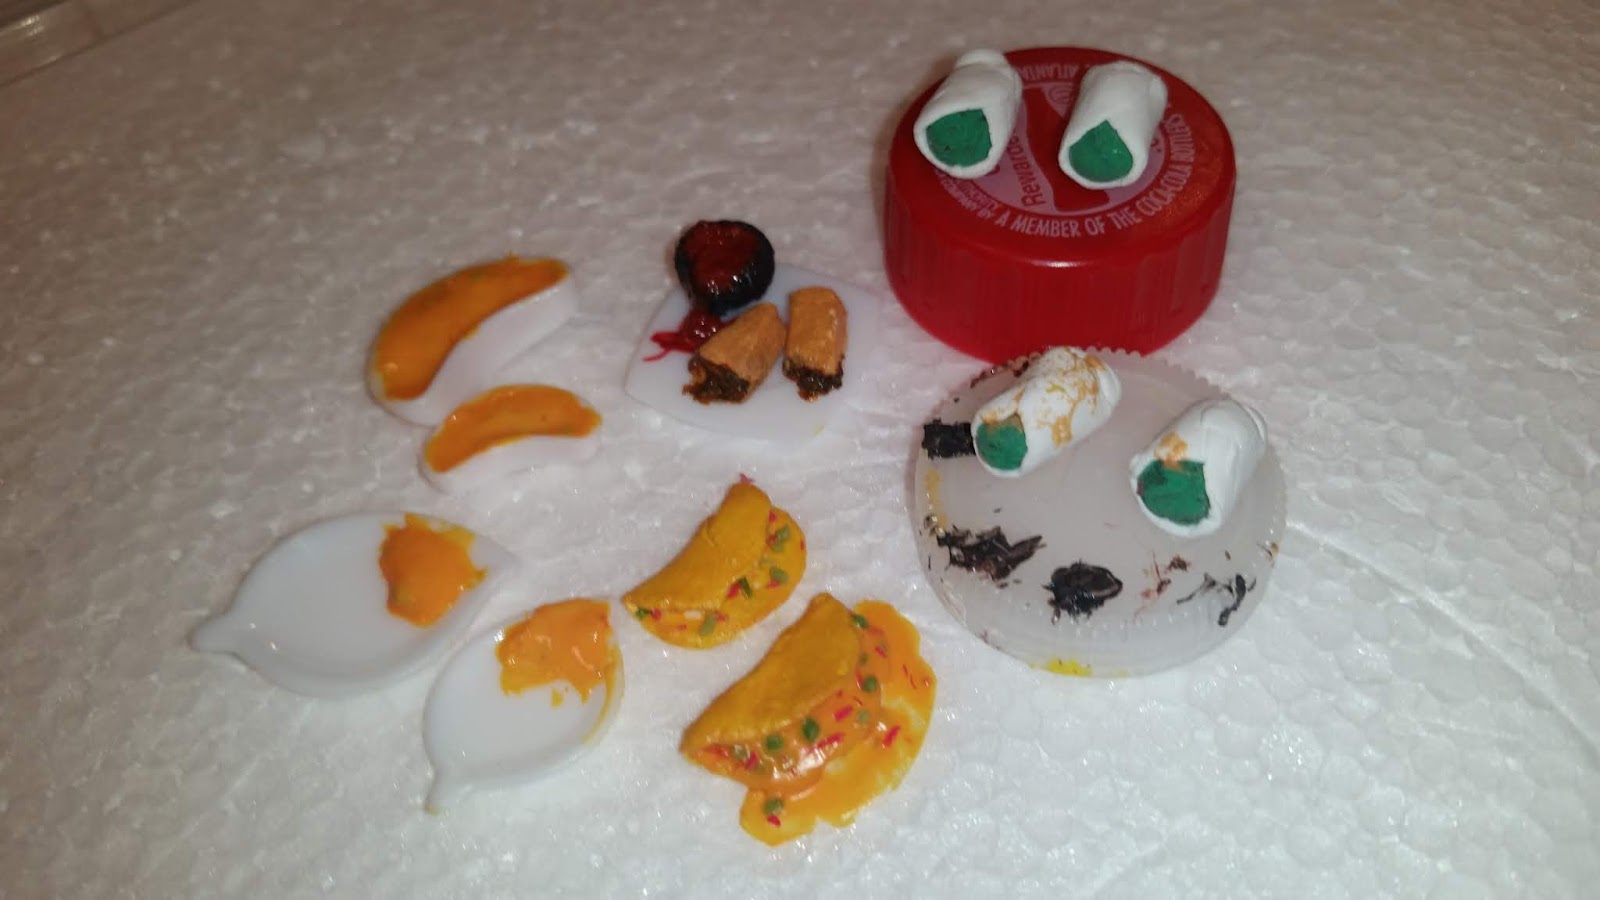
First off, on the right side of the photos shown below, are some beautiful burritos in progress! To make them, I wrapped a bit of white air-dry clay around some extra scrap green clay. It seemed like a better idea than making the actual ingredients and waisting majority of the items inside since I normally paint the outside of the mini anyways.

Next to the in-progress burritos are two bean enchiladas. In reality, the two enchiladas are actually just two beige pieces of scrap clay that I trimmed in an enchilada shape. To start transforming the two pieces, I mixed brown, yellow, orange, red, and white Puffy Paint to create cooked-bread colored paint. Then, I used a paintbrush to brush both pieces with the bread colored Puffy Paint mixture. While waiting for the pieces to dry, I cut up a piece of brown scrap clay into several small pieces & mixed the pieces with a mixture of red, black, and brown Puffy Paint. Doing this created a mixture that looked very similar to a bean mixture oozing out of an enchilada. Finally, I applied the mixture onto the end of both enchiladas.


Right in front of the bean enchiladas and next to the WIP burritos are some delicious omelets! Being my first ever time creating miniature omelets, I think they turned out pretty well! First, just like the enchiladas, I painted the omelets to give them a yellow-ish cooked look. Next, I cut a piece of green & red scrap clay into several small pieces. After that, on the first omelet, I used a bit of Tacky Glue to attach a few of the cut up pieces to give the omelet some color & look like seasonings. Then, I mixed Tacky Glue with orange, red & yellow Puffy Paint to create a cheesy looking mixture. Finally, I spread the mixture onto the inside of the second omelet and added a few of the extra scrap clay pieces on top.

The final minis-in-progress in the photos below are two bowls of queso dip and two plates with a bit of queso dip on the side. At the moment, I'm still working on the other minis to go along with the queso dip. I'll be posting photos of the finished dishes with queso dip & the finished burritos soon!

I hope you liked these tasty inedible minis!


Until next time,
- Cat

Wednesday, June 6, 2018

Needle Felted Pink Heart

Hello crafters!

I'm so excited to finally post my first-ever needle felt creation!

Before getting into any giant projects, I decided to start off with a simple needle felt creation. To create the heart shape, I just stuffed the felt into a heart mold & kept poking the felt with the needle until it started to turn into the shape. It took about 3 hours to create, but was really fun! 

It's such a cute little heart! I think it turned out pretty well for my first needle felted creation.

What do you think of this creation? If you have any suggestions for what needle felted creation you'd like to see next, feel free to let me know in the comments!


Until next time,
- Cat

Tuesday, May 15, 2018

Marshmallow Roasting Prep Board

Hello crafters!

After a few weeks of crafting a ton, I'm super excited to finally post another new mini creation of mine!

Recently, I finished creating a beautiful Marshmallow Roasting Prep Board. It was actually a pretty interesting type of prep board to try considering I had never tried to make miniature sticks. I'm pretty happy with the final result.

To create the sticks, I gathered two toothpicks along with glue, and 3 brown markers, each a different shade of brown. First, I cut both toothpicks in half. Next, I cut off the toothpick tips on 3 of the toothpick halves. Then, I used a light brown marker to color all 3 pieces. After that, I colored the 3 toothpick halves lightly with a medium brown marker & a dark brown marker. Then, I glued the toothpick tips onto the already-colored toothpick halves. After a few minutes, once the glue had dried enough, I colored the tips in the same sequence that I colored the toothpick halves. Once I finished adding the tips, the miniature sticks were completed!

After I had finished making the miniature sticks for the prep board, I started working on the marshmallows! The marshmallows were a lot easier to create. First, I gathered some white air-dry clay. Next, I rolled a small piece of white clay into a ball. Then, I pressed the ball down just a touch & shaped it enough to form a marshmallow look & shape. After that, and once I added the marshmallows onto the sticks, I mixed a small bit of black Puffy Paint with brown Puffy Paint to create a dark brown color. Finally, I used a toothpick to spread a super light coat of the dark brown Puffy Paint onto the marshmallows on the sticks to give a 'Cooked Marshmallow" look.

I really love the final result! What do you think?


Until next time,
- Cat

Monday, April 16, 2018

Handmade Dollhouse Miniature 1:12 Scale Kitchen Towel, Pot Holder, and Oven Mitt

Hello crafters!

Haven't posted in a few weeks since crafting has been taking up a ton of time. Don't worry, I'll be trying to post a little more often!

Lately, I've been working on creating a few new miniature items with fabric & felt. A few of those miniature items include a 1:12 scale miniature kitchen towel, pot holder, and oven mitt. (items are shown in the photo below!)


The hardest mini item to create out of all three items was actually the oven mitt. First, to create the oven mitt, I gathered white felt & black thread. Next, I spread Tacky Glue on the white felt. Before the glue had fully dried, I cut out two oven mitt shapes. Then, I placed both oven mitt shapes neatly on each other so the glue would stick the pieces while hardening the felt a little bit so I could easily sew through it. After that, while the glue on the oven mitt was almost dry but not too hard, I started hand-sewing the sides of the oven mitt. Finally, after I finished sewing the oven mitt, I glued both ends of a piece of thread into the corner of the oven mitt to make a little holder.

I had actually created the kitchen towel and pot holder before the oven mitt. To make the kitchen towel and pot holder, I bought an actual checker-printed kitchen towel and cut it down to 1:12 scale size. Since the towel I was using did unravel, I spread Tacky Glue on a piece of it before cutting it down. Before the glue-drowned towel piece was completely dry, I cut out two square pot-holder-sized pieces and pressed the two pieces together. After the two pieces dried together, I carefully squeezed both ends of a piece of thread between the two pieces of the pot holder. Once it was dry, the pot holder was finished!

To finish creating the kitchen towel, I waited until the towel piece covered in glue was dry. Once it was dry, I carefully used my scissors to cut down the towel piece to the size of a 1:12 scale kitchen towel. Finally, I trimmed up or glued any extra strings or pieces hanging off of the towel.

I hope you liked this miniature pot holder, oven mitt, and kitchen towel!

Until my next craft,
- CrazyCraftyKitty

Friday, March 23, 2018

Miniature Clay Easter Scene Inside a Jar

Hello crafters! 

Although I haven't exactly completed many Easter crafts yet, I started working on this adorable Easter craft just a few weeks ago!

After seeing other amazing crafters make such adorable scenes inside of clear miniature jars, I decided to try one myself! I was originally planning to make a cute little fairy scene but instead decided to create an Easter scene. Considering the jar is just about 1 inch tall, it took hours of focused, steady work. 

First, I got green clay & used tweezers to stick it inside. Once it was in the jar, I used a needle tool to make it look like grass. Next, I got super small pieces of purple, pink, orange, and yellow clay rolled them into tiny Easter eggs and placed them inside the jar using my tweezers & needle. After that, I started working on the chocolate bunny! This was actually the first chocolate bunny that I've ever made in any size. To make it, I placed a small piece of flat brown clay on a flat board and used a toothpick to shape it. Took a while to get a bunny with a perfect look, shape, and size. Finally, I placed the chocolate bunny inside the jar!

For my first ever miniature scene inside a miniature jar, I think it turned out pretty well! What do you think?

I hope you like it!


Tuesday, March 13, 2018

Disney Descendants Evie Inspired Handsewn Pincushion

Hello crafters!

Since this weekend's challenge on the app, Crafty Amino was themed with royal crafts and royal includes not only good royals as in queens, kings, princesses, and princes, but also rotten-to-the-core royals, I decided to go with a Disney Descendants themed craft.  A little while after I came up with an idea for a theme to use, my sewing needle had accidentally dropped again.  Once searching & finding it another time, I figured that I definitely needed a new pincushion, small enough to fit with my sewing things, but big enough to stick my needle into.

 All of that is what finally brought me to the conclusion of making . . . . . . . . A Disney Descendants Evie Inspired Pincushion!  But wait!  You're probably wondering how Evie, Daughter of the Evil Queen, is royal?  Well technically, since her mom is a queen, evil or not, she would have to be a princess.
Here is how the pincushion turned out:

This was actually the first pin cushion that I've ever made so I'm really pleased with the result.  Luckily I took a few photos while making this pincushion which is what makes this a perfect craft to turn into a tutorial for any Descenders that would like to make their own!

Ready to start this tutorial?  Before you start, make sure to have these tools, which are listed below, nearby!

For this craft, you'll need:
- Sewing needle
- Scissors
- Gold thread
- Red felt

- Gold felt
- Stuffing


After I gathered all of my supplies, I started cutting out the pattern.  First, I cut out two crown shapes in the gold felt and two heart shapes in the red felt.


Next, I placed both red hearts neatly on each other, threaded my needle with gold thread, and started sewing.

Before I finished sewing the heart together, I stuffed it with stuffing.

Then, I finished sewing the heart together and started sewing the two crowns in the same way I sewed the heart.  I also sewed the top of one half of the heart to the crown.

 After that, I kept sewing the crown.  Took a little while to sew every point and edge.

 Finally, I stuffed the crown with stuffing and finished sewing the crown together.  This Evie inspired pincushion is finished!
I hope you liked this tutorial!

Sunday, March 11, 2018

Miniature Doll Velcro Bracelet (Tutorial

Hello crafters!

A few days ago I was trying to come up with a way to easily make a miniature bracelet for dolls without needing to glue, use clay, paint, or sew. I ended up making a super cute green emerald doll bracelet & I'm so excited to finally show you all how to make your own one!
Photo of the emerald bracelet.

Ready to start this super cool tutorial? First, here's what you'll need:
- A headband with jewels on it
- Scissors
- Velcro with sticky backings
- A doll (I used a Barbie doll)

Once you've gathered those three items, it's time to start making the bracelet! First, I wrapped part of the headband around my Barbie doll's wrist to get an idea of the size. I mainly just estimate sizes for the majority of my crafts, but if you're trying to get an exact size, I'd recommend using a tape measure.

Next, I cut off a small piece of the headband with about five and a half decorative gems on the piece.


After that, I cut up both pieces of velcro into small rectangles, basically the size & width of the end of the small headband piece. Stick one velcro piece to one side and the other piece to the other side of the cut off headband piece.


Finally, make sure the velcro is securely attached.


Your miniature doll bracelet is finished! Feel free to attach & detach the mini bracelet on your doll as much as you'd like!


I hope you liked this tutorial!

Friday, March 9, 2018

MIniature Alligator - Finished!

Hello crafters!

You might remember an adorable miniature alligator that I had posted a WIP post on earlier in February. Either way, I'm super excited to say, I finally finished it a few days after the original WIP post.

Haven't found the time to post it over the last few weeks, but I'm super excited to finally reveal this adorable alligator! And . . . . . . . here she is!
Pretty awesome, right? Not too many changes have been made since the WIP post, but there are many details when looking closely at it.

For the scales of the alligator, I used a few different markers with a few different shades of green, along with green sun catcher paints to give the alligator more of a realistic look. Next, I used white & black Puffy Paint to lightly color the eyes. Then, I used some white Puffy Paint to paint the alligator's sharp teeth. Finally, I used a toothpick with green sun catcher to fix any extra mistakes.

Well, I hope you like this adorable alligator!


Miniature French Fries Made With Scrap Clay (Tutorial)

Hello crafters!

Normally, whenever I'm trying to make miniature french fries, I use a light yellow clay color and shape out each individual french fry. Due to not being able to work with clay for the past few days, I came up with a much quicker, easier way to make miniature french fries. Surprisingly, I actually like these french fries a little better than my normal ones. 

In this craft, I'm using scrap clay to make the mini french fries. If and when you have worked with air-dry clay for a few months, a few scrap pieces of clay that have accidentally dried might start to accumulate.  As a tip for any other crafters reading this, never throw anything away. Scrap pieces of clay, plastic containers, scrap pieces of fabric, paper with writing on part of it, etc. All types of things can amazingly be used to make cool, new things.

So after a long intro, it's finally time for the tutorial part of this post!

HOW TO MAKE MINIATURE FRENCH FRIES:

What You'll Need:
- Yellow french fry colored piece of scrap clay
- Scissors

First, I cut off two small rectangle-shaped pieces of clay.

Next, I vertically sliced both pieces in half, now turning the two slices of clay into four slices of clay.


After that, I horizontally cut all four of the pieces in half. Once I finished doing this, there were now eight small slices of clay, also known as eight adorable mini fries.


Finally, I glued the mini fries together on a miniature plate. I added some ketchup, mustard, and a hot dog in a bun on the side! 

I hope you liked this tutorial!