Tuesday, October 31, 2017

Costume Countdown Day 3 Part 1 - Cat Bell

Happy Halloween crafters!

Since being a day late on one of our Costume Countdown posts a few days ago, we will be posting our last two costume pieces today.

Today i`m super excited to reveal one of my favorite costume pieces - a cat bell!

A few weeks ago I started working on it. It was pretty easy to make, I just used some leopard print stretchable fabric, sewed it into a choker necklace and then sewed a bell onto in. Had to stitch the bell to the fabric a few times so the bell would not fall off.

Took a few hours to make but it ended up turning out pretty well. I hope you like it!


Check back in a little while for my last Costume Countdown Piece!

Monday, October 30, 2017

Costume Countdown Day 2 - Descendants 2 Inspired Skirt

Hello crafters!

Super sorry for being so late on posting Day 2 of the Costume Countdown.  Was busy crafting yesterday and didn`t have time to post.

Well onto the Costume Countdown Day 2 craft!

For this craft, I decided to try reusing an old skirt to repaint it inspired by Evie in the Disney movie, Descendants 2.  To paint it, I used black, purple, dark blue, red, and yellow puffy paint.  As you can see in the picture below, I used the yellow and red Puffy Paint to paint on Evie`s heart & crown symbol.

Took a few hours to redo but I think it turned out pretty good. What do you think?
I hope you like it!


Saturday, October 28, 2017

Costume Countdown Day 1 - Cat Ears

Hello crafters!

Since it`s just a few days till Halloween, I have decided to do a costume countdown! For the next few days until Halloween, I will be posting a new costume piece i`ve recently made!

Well, it`s time to get to day 1 of Costume Countdown!

A few weeks ago I was working on some brand new cat ears! They were pretty easy to make. First, I got an old headband & some pink & brown felt. Then, I just sewed some brown felt onto the headband along with adding a touch of glue to make sure it stayed. After the brown felt was attached to the headband, I sewed on the ears. I added some stuffing to the ears to make them a bit bigger and fluffier.

These ears were so much fun to make!:) I hope you like them!


Make sure to check back tomorrow for Day 2 of my Costume Countdown!

Potatoes & Sausage

Good morning crafters!

So a few days ago I started working on some delicious mini potatoes & sausage! They were so much fun to make!

I started making the potatoes by mixing some white clay with a small touch of yellow clay, and beige clay. Once it was the perfect color, I glued it to the plate. After it was glued I used the ends of a few tools to give the potatoes a mashed-like texture. I then used a toothpick and slightly dotted different areas of the mashed potatoes with red, green, black, orange and brown Puffy Paint to make it look like seasoning.

After I finished the potatoes I started working on creating the sausage. I mixed some red clay with a small touch of black to make a dark maroon color. Next, I rolled it into a sausage shape and glued it to the plate next to the potatoes. Finally, I slightly used a touch of black Puffy Paint and lightly painted small areas and sides of the sausage to give it a burnt look.

I love make mini food so tiny! The whole plate is about half of an inch.

I hope you like it!

Friday, October 27, 2017

How to Make A Strawberry & White Icing Cake Tutorial

Good morning crafters!

After being up all last night crafting, it seemed like a perfect time for a break & to post a new craft I made just a few hours ago. *Started the first of the post yesterday, so it has been closer to a day since I made it now. Crafting really can be tiring . . .

Anyways, I was working on a beautiful mini strawberry with white icing cake! Although it is a mystery of how it was made, well at least until now! (strawberry with white icing cake with chocolate chip on top shown below)⇓


The pretty cake with white icing in the picture above is actually mainly made out of foam! I cut three circles out in foam sheets then I just used a calk-like substance to cover it in white icing. Luckily I was taking pictures of it while I was creating it just in case I decided to show a quick tutorial on how I made it. It worked out pretty well so, why not show a picture tutorial?

You`ll need:
- 2 or more different colored foam sheets
- scissors
- Calk, Puffy paint, or pretty much any kind of thick substance that can look like icing or whipped cream. I used a substance similar to calk, just a little different. Puffy paint should work the same too.
- Glue (I used Tacky glue, but pretty much any glue should do.
- A mini cake, bottle cap, or anything circle & about the size you want to make your cake. *no need in this if you can draw a straight circle*
- A marker


1.
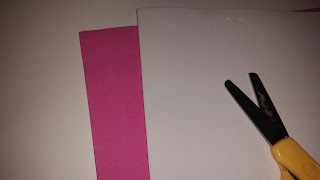
I decided to start off with a pink foam sheet. First, I put a mini cake on the piece of foam and slightly traced around it with a marker. I also drew in the open part of the cake to have a perfect size for a cake piece.
Finished drawing. I only traced the cake and only drew in the area for the cake piece to know where to cut.

2.
Secondly, I used scissors to cut out the cake and cake slice.


3.
Next, I put the cut out cake shape on top of another piece of foam and cut it out. Now it`s almost exactly the same size as the other piece.

Did the same thing with the piece of cake.


4.
Put one of the pink cake shapes on a white piece of foam to cut it out. So basically repeat step #3 again, just with another color of foam. I chose white, but other colors should work just as good for the inside icing.


5.
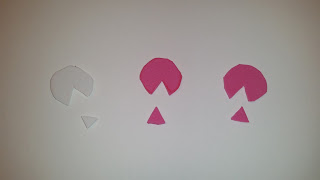
I`ve cut out three cake shapes now. Two cake shapes are pink, and the third one is white. Now it`s time to add glue!

In the picture above you  can see how it looks once i glued the cake together. I glued the white cake shape in the middle to make it look like icing inside of the cake. I did the exact same thing to the cake piece.


6.
By this time, the glue had dried enough. I used a toothpick to spread the white icing on the cake!

I mixed the fake white icing with a small touch of red Puffy Paint to turn it into a light pink color. I used another toothpick to spread the pink icing on the strawberry part of the cake. The pink icing gives it a flaky effect.


It is officially finished! Was really so much fun to create the cake and tutorial for it. Hoping to make more tutorials soon.

Hope you like it! 


Wednesday, October 25, 2017

Turkey Scene

Good evening crafters!

 I`m super excited to finally be finished with this adorable crraft! It took a few days to come up with an idea & make it, but I think it was all worth it. I was actually working on this craft as an entry for a contest on the app, Crafty Amino.

 When I think of November, it reminds me of fall & Thanksgiving, so I decided to use it as my inspiration for this craft. I ended up using clay to create a mini scene on the top of a squashed pumpkin. In the scene, I created a walkway made out of fall leaves, and a mini turkey walking down the walkway. I also made a small miniature pumpkin next to the turkey.

 It took a few hours to make but was sooo much fun! I hope you like it!

Tuesday, October 24, 2017

Mini Bread Rolls

Hello crafters!

I`m here again with another newer craft!

So this time i`ve decided to create some yummy & delicious miniature bread rolls. They were much easier to make than I imagined.

I started making them by rolling out some beige balls. Next, I textured them a little using a few paintbrushes. After that I just brushed them a bit with some chalk. The rolls are finished!

They were really easy, fun, & quick to make! hope you like them!


Super MIni Rice & Nuggets

Hello crafters!

A few hours later i`m here again with another mini I made a few days ago around the same time I made the blueberry pancakes. Only difference is that this miniature dish is a bit different type of food, and a bit smaller.

I decided to try to create some delicious rice & chicken nuggets. I made the rice out of white clay i textured. I slightly colored the rice with some yellow, and orange Puffy paint. After finishing the rice, I started working on the nuggets. I rolled out small balls, then pressed them down and textured them with sandpaper. I used white clay and a toothpick to make the bitten-into-nugget`s inside.

Took a few hours to make this as well. Did not make the plate, but the size of the plate is about half of an inch, so i`d say the nuggets or rice is about 1/4 of an inch.

Hope you like it!


Blueberry Pancakes!

Good morning crafters!

Today i`m so excited to finally show you one of my newest delicious foods, BLUEBERRY PANCAKES!

These have been so so very fun to create! To make them, I just flattened out balls of beige clay and used chalk chalk to darken the tops of the pancakes. After that, I rolled out small blue/purple colored balls of clay and used a needle tool to add a hole in the middle. Then, I used Puffy Paint to stick the blueberries to the pancakes and make a bit of blueberry sauce and blueberry stains. I had actually mixed a few Puffy Paint colors to get the perfect blueberry color. Didn`t make the plate but it was a perfect size for the pancakes.

It took about 2-3 hours to make but was totally worth it. Hope you like it!


Monday, October 23, 2017

How to Make a Miniature Doll Bacon Costume

Hello crafters!

Since Halloween will be here soon, I decided to create a bacon costume along with a video tutorial on how to create a bacon costume using paper, tape, and markers! It`s taken a few days to edit, I`m super excited to finally reveal my first video craft tutorial!

Also working on a rapunzel inspired miniature costume doll dress that I`m planning to be posting soon as well.

Anyways, here is the tutorial!


Hope you liked it, & happy halloween!

Sunday, October 22, 2017

Candy Corn Cookies

Good morning crafters!

Today I have a pretty new mini, candy corn cookies!

They turned out to be pretty easy, all there really is to do is put a long piece of white, orange, and yellow clay. Then, cut out the triangle can corn cookies!

The were SO00 fun to make, hardest part of it though? They are so delicate, I ended up breaking almost half of the batch of mini candy corn cookies.

I hope you like them! Happy Halloween!


The Freaky Finger

Hello crafters!

 Once upon a time, a cat created a finger out of clay, colored it, painted the fingernail, and made it look as realistic as possible. When she finished making it, she went to bed. That night was the very same night a giant thunderstorm came. A flash of lightning struck and brought the finger to life! It had adorable kawaii eyes, a cute cat mouth & paws! As cute as the finger was, it was not just any alive & cute finger. It was a super power evil finger! Before the cat who created the finger woke up, the finger flew away! No one has seen any sight of the finger since then, and right at this moment it could be plotting to take over the world. We might never know where it is or what the finger is planning, but luckily we got a few pictures of the finger before it came to life . . .

 Well I hope the story was entertaining! Now it`s time for the actual craft!

 So yesterday I was working on creating a finger about the size of my finger. I figured it would be a good finger to use in pictures with other minis. Then when I was almost finished it started to look like a spooky Halloween inspired finger. Wasn`t going for Halloween finger, but it kinda has started to make me think "what if it comes to life?", so luckily it`s a good time of year for evil fingers. 😁

I pretty much just used chalk and toothpicks to make the colors and textures and finger print. I ended up using red and gold metallic Puffy Paint to paint the finger nail. Anyways I hope you like it & happy Halloween!


Friday, October 20, 2017

Candy Canes!

Good evening crafters!

Today i`m working on some new red & white, green & white, and blue & white candy canes!

Been working for the last few days on tons of candy canes. They are pretty easy to make, just get a piece of white clay and a piece of red clay, then twisted the two pieces of clay to make a peppermint stripe. After making a long clay peppermint stick, cut off a certain amount of it (depending on how big or how small of a candy cane you`re making). With the long peppermint stick, slightly bend one end of it to make it into a cane shape. You`re candy cane is finished!

The candy canes in the picture below are just about half of the ones i`ve made, i`d say the amount of candy canes since I took the picture is probably close to 100.

Anyways, i`ll be creating & posting either a picture or video tutorial on how to make candy canes soon! But for now, these are some of my candy canes I made a few days ago! Hope you like them . . .


Wednesday, October 18, 2017

WIP Wednesday Christmas Baskets

Hello crafters!

So this craft is of course another project i`m working on, some mini baskets!

Used some yellow-ish beige clay to make long strings. I then used my finger to help wrap the strings around and shape the baskets. Planning on adding some candies in the baskets soon!

Hope you like them so far, i`ll be posting updates on them once they`re finished!


Burgers, French Fries, and Nuggets

Hello my crafty friends!

 The last few days i`ve been creating such small mini things! And today, I have a project that is finally finished! Super small mini burgers, french fries and chicken nuggets! Along with ketchup and mustard of the side of course!

I made everything except for the plates (which were bought). Took a few hours to make but was totally worth it! Didn`t really use any other texturing tools besides my hands and sand paper. Used Puffy Paint for the ketchup and mustard.

 The plates are about half of an inch & i`d say the burgers are about 1/4 of an inch, so it`s closer to a 1:24 scale size. Working on some new cakes now that are about the same size.

 hope you like them!


Tuesday, October 17, 2017

Christmas Candy Canes In Progress

Good evening crafters!

Although it may seem a bit earlier, i`m already working on some mini candy canes! 

They are actually very easy to make. I just got a stick of white clay and red clay, put them side-by-side and twisted it to make a long, non editable, peppermint stick. Then I just cut off enough of the clay peppermint stick for the size I want & bend the top of it to make a cane look. I`ll be showing a picture tutorial on how to make them soon!

Anyways this is how many candy canes I have made so far! Planning to make some more soon! 

Monday, October 16, 2017

Halloween Trick-or-Treat Candy Bucket

Good morning crafters!

 I`m so excited to show you all one of my newest clay creations, Halloween inspired jack-o-lantern candy buckets! They are perfect to go trick or treating with, just only 1:12 scale doll candy would probably fit in them!

 They just took a few hours to make. I made them basically like a normal mini pumpkin just with a handle instead of a pumpkin top. I also used a toothpick to carve the pumpkin faces. I made two candy buckets with one in purple and the other in orange. Planning to make a few more soon for a mini Halloween party room i`m working on. Well, I hope you like them!


Saturday, October 14, 2017

Peach Pecan Cake!

Hello crafters!

Today i`m super excited to show one of my newest cakes, a peach pecan cake!

 It was so much fun to create! I used calk mixed with orange paint to make the icing and topped it with two adorable little pecans. I love the realistic look so much! Going to have to make more cakes like this soon!:)

 Hope you like it!!!

Thursday, October 12, 2017

Golden Thread Leopard Purse

Good afternoon crafters!

I`m here again with another new craft! I have basically been dreaming in craftland.

So I just finally finished one of my newer crafts, a perfect 1:12 scale size leopard purse! It took me a few hours to create it since it was the first mini purse i`ve sewn. I think it turned out pretty well though!

I had found some leopard fabric and figured it seemed like it could grow into the perfect purse. I used some brown ribbon for the handle and golden thread for the rest of the purse.

I hope you like it!

Neapolitan Ice Pops

Hello crafters!

I`m super excited to show another craft i`m in progress making, some neapolitan ice pops!

They were pretty easy to make, I just put a layer of brown, white and pink clay, shaped it a little and used a toothpick to poke a hole on the bottom. All that`s left to add is the sticks & I will be finished!

Hope you like them so far!

Hot-dogs In A Bun!

Good morning again crafters!

Now since it has been a few hours since my last post, I have another new mini to show, or more like new minis to show!

A few days ago I created some new & adorable hot-dogs in a bun! First, I flattened out some beige clay and shaped it a litte. Next, I rolled out a small hot-dog using dark red clay, put the mini hot-dog in the middle of the beige clay, and folded the beige clay over. Finally I used some red & yellow Puffy Paint on the hot-dogs as ketchup & mustard.

These are actually just 2 out of 5 of the first hot-dogs in a bun I made. I can`t wait to show you the others and some super new hot-dogs in a bun, burgers, french fries and nuggets I made earlier today, I should be posting them soon!

Anyways, I hope you like these hot-dogs in a bun!😀❤