
Hello crafters!
This past weekend I've been crafting a ton! But wait, why haven't I posted any crafts that I made during this past Thursday & Friday? Well, during both of those days I was working on a handmade Mardi Gras inspired mask!
I had decided not to buy any masks since I figured, why not make my own homemade mask since it would be cheaper and could look better? I did not expect for it to be so much work to make one little mask, but in the end, it all turned out perfect!
Okay, now onto how I made it!
To make the mask I figured the basic part would need to be strong enough to stay together but soft enough to wear on my face. I ended up deciding to make it out of foil, toilet paper, and a paper towel. Weird objects, right?
So first, I just got a piece of foil and started trying to use my mannequin head to make it into a mask shape. After shaping it a bit, I cut off the big parts that I didn't need and cut out the eyes. Next, I just slightly glued the piece of foil to the mannequin face to keep the shape and decorate the mask. Next, I got a few pieces of toilet paper and started tearing them into pieces and slightly gluing them onto the foil. I added about 2 layers of toilet paper pieces and glue on top of the foil. Once it dried, the mask was actually much harder.


Didn't pull the mask off the mannequin face since it seemed much easier to decorate it first so I wouldn't bend it by accident.
Then, I cut up a piece of a shimmery pearl-looking sheet of cardstock paper. I had this extravagant idea of a shattered glass diamond mask. Since I was going for a shattered glass look, I kept cutting the pieces of paper until they were tiny and sharp. If you're trying to make something similar to this, be super careful! The sharp pieces of paper actually hurt my hands many times while making this . . .
Afterwards, I started gluing the sharp pieces of paper onto the mask. I tried placing each piece perfectly on the mask to give a shattered effect. Kept doing this over and over and over and over . . . .
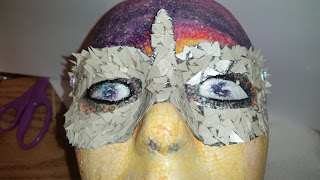
After that, I coated the mask with a bit of silver glitter Puffy Paint and added a few more pieces of shattered paper on top. Then, I went through my beads/shiny things bin to find the perfect decor for the mask!

I found some clear stones, a few mini flowers, and gems. Ended up mainly just using the gems. I also got some Mod Podge to use a little while later.

By this time, I finished adding shattered looking pieces of paper to the mask and re-coated the top with silver glitter Puffy Paint to give the mask a shimmery glitter look.
Here is how it looks in the light:


A bit harder to see, but if you look closely, you can see the mask glowing! Pretty cool, right?
This past weekend I've been crafting a ton! But wait, why haven't I posted any crafts that I made during this past Thursday & Friday? Well, during both of those days I was working on a handmade Mardi Gras inspired mask!
I had decided not to buy any masks since I figured, why not make my own homemade mask since it would be cheaper and could look better? I did not expect for it to be so much work to make one little mask, but in the end, it all turned out perfect!
Okay, now onto how I made it!
To make the mask I figured the basic part would need to be strong enough to stay together but soft enough to wear on my face. I ended up deciding to make it out of foil, toilet paper, and a paper towel. Weird objects, right?
So first, I just got a piece of foil and started trying to use my mannequin head to make it into a mask shape. After shaping it a bit, I cut off the big parts that I didn't need and cut out the eyes. Next, I just slightly glued the piece of foil to the mannequin face to keep the shape and decorate the mask. Next, I got a few pieces of toilet paper and started tearing them into pieces and slightly gluing them onto the foil. I added about 2 layers of toilet paper pieces and glue on top of the foil. Once it dried, the mask was actually much harder.


Didn't pull the mask off the mannequin face since it seemed much easier to decorate it first so I wouldn't bend it by accident.
Then, I cut up a piece of a shimmery pearl-looking sheet of cardstock paper. I had this extravagant idea of a shattered glass diamond mask. Since I was going for a shattered glass look, I kept cutting the pieces of paper until they were tiny and sharp. If you're trying to make something similar to this, be super careful! The sharp pieces of paper actually hurt my hands many times while making this . . .
Afterwards, I started gluing the sharp pieces of paper onto the mask. I tried placing each piece perfectly on the mask to give a shattered effect. Kept doing this over and over and over and over . . . .

After many hours (really should've timed myself), I finally finished placing the shattered pieces of paper on the mask, now it was time to add a bit more sparkle!
First, I coated the mask lightly with glue and added a little gem on both sides!

After that, I coated the mask with a bit of silver glitter Puffy Paint and added a few more pieces of shattered paper on top. Then, I went through my beads/shiny things bin to find the perfect decor for the mask!
 |
| It took awhile. |

I found some clear stones, a few mini flowers, and gems. Ended up mainly just using the gems. I also got some Mod Podge to use a little while later.
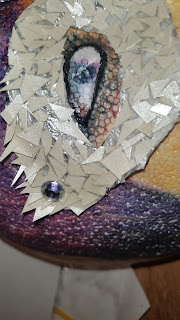
 |
| Adding more paper to the mask. |

By this time, I finished adding shattered looking pieces of paper to the mask and re-coated the top with silver glitter Puffy Paint to give the mask a shimmery glitter look.
Didn't get to take any more pictures in the making, but once I finished coating it with silver glitter Puffy Paint, I added two more gems on the sides and a few gems in the front. After that, I scraped the mask off of the mannequin face gently and padded the back of it with a paper towel so the foil wouldn't scratch my face. I then added some feathers and attached a string to both sides. I coated the mask with Mod Podge to make it a bit shinier, and it was finished!
Wait, one more thing! The last thing I did to the mask was coat the sides of it the glow-in-the-dark Puffy paint!
Now it was finished!
Here is how it looks in the light:

Now it took so many tried to get this picture of the mask in the dark. Kept having to turn the flash on the camera off and on, but I finally got a photo! Here is how it looks in the dark:

Had so much fun making this! I hope you like it!
No comments:
Post a Comment