Saturday, February 24, 2018

Miniature Gray Puppy

Hello crafters!!!

I'm super excited to finally post this adorable craft after so many days! I had actually made this craft last weekend specifically for a friend's birthday gift. 

For this craft, I decided to create an adorable mini gray puppy! I had actually created it by repainting another miniature dog. This was one of my first times repainting any animals so I think it turned out really good!

To make it, I found a miniature white puppy of mine that I wanted to repaint. Next, I mixed white, black, & orange Puffy Paint to make the gray color. Then, I painted the puppy with one coat of gray. After that, I got 2 white pipe cleaners and used scissors to cut all of the white fur off. Then, I mixed the fur in with the gray paint until all of the fur was gray. After that, I lightly applied the gray paint/fur onto the puppy. Finally, I used a toothpick to apply black Puffy Paint onto the puppy's nose & eyes to fix any parts that I had accidentally messed up.

I started working on this puppy last Friday night and finished Saturday afternoon. Pretty impressed with how amazing it turned out within such little time!

I hope you like it!


Friday, February 23, 2018

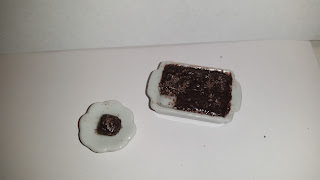
Delicious Mini Brownies With Chocolate Sprinkles

Hello crafters!

Today I'm super excited to post these adorable mini chocolate sprinkle brownies that I made a few weeks ago!

I used white air dry clay to create them. I had made them by adding white clay into the little ceramic dish & shaping a separate piece of white clay into a square. Next, I mixed a few Puffy Paint colors with sun catcher paints to make a thin chocolate brown paint. Then, I used a toothpick to paint the brownies. I flaked the inside of the brownies & the brownie on the side using the same toothpick that I used to paint them so the inside would be fully brown instead of white. After that, I sprinkled chopped pieces of chocolate colored clay on top of the brownies to look like sprinkles. Finally, I used a needle tool to add lines on the top of the brownies to look like if they were being cut into separate brownie squares.

Well, I hope you like these delicious brownies!


Tuesday, February 20, 2018

Disney Descendants 3 Inspired MIni Cake

Hello crafters!

I'm super excited to finally post this new & delicious mini cake that I just finished making Saturday!

This cake is actually inspired by Disney's Descendants. After Disney confirmed a third Descendants movie this past Friday, which is scheduled to premiere in 2019, I decided to use it as the theme for one of the mini cakes I was working on! Though, since there is not much information about the movie yet, it was a bit challenging to come up with a cake idea.

After deciding to come up with the idea as I went along, I decided to give the cake purple grape frosting, with golden icing dripping dow,n and an apple with a number 3 written on it on top! The pink inside of the cake was an accident and was originally planned to be white. It changed to pink when a dot of red acrylic paint accidentally got on the inside of the cake & I had tried to fix it with white Puffy Paint.

Have to admit, not my best mini cake. Not a fan of the strawberry inside & the apple seems a bit sloppy, but hopefully, my next Descendants inspired mini cake will look much better!

Well, I hope you like it!


Friday, February 16, 2018

Stir-Fry Prep Board!

Hello crafters!

I'm so excited to finally post one of my brand new prep boards!

This is actually one of my favorites out of all of the prep boards that I've recently made. I decided to make this prep board inspired by making a delicious stir-fry. In the pot, you can notice some delicious carrots, beef, celery & other seasonings frying. Next, to the pot, there are some delicious yellow peppers, garlic, red peppers, beef, lime slices, and some celery being cut up with a mini knife!

To start off, I made the clear prep board bottom by cutting out a square of plastic out of a Q-Tip container. Next, I created the mini pot out of paper & Puffy Paint. Then, I made the beef, carrots, and seasonings out of orange, brown, red, and green scrap clay. After that, I made the little knife out of foil & used my fingers to shape it into a knife shape. Finally, I cut off a few pieces of the mini celery to make it look like it had been cut up with the mini knife & glued everything to the prep board. 

Didn't make the celery, lime slices, yellow peppers, garlic or red peppers. They were just a few extra mini foods that happened to fit perfectly into the scene.

Will be posting a tutorial showing how to make a miniature pot like the one on the prep board, so make sure to check back soon!

Well, I hope you like it! 


Wednesday, February 14, 2018

Valentines Day Cards!

Happy Valentine's Day crafters!

I'm super excited to finally share these Valentine's Day cards I just finished making!

Once I got a few ideas for the designs, they weren't too hard to make. First, I started working on creating the card design. Next, I adjusted the size of the cards & printed them out. After that, I just cut them out and folded each card!

Photo of how these lovely cards turned out shown below!

Want to make them yourself? Here's the link to the templates I used:

https://docs.google.com/document/d/1I9Sq0MjXoY8RDf4_Ig6kxgN0AeS9YGEK2yQ2Oo0nhY4/edit?usp=drivesdk

I hope you like them!


WIP Teddy Bear

Happy Valentine's Day crafters!

I'm super excited to finally post another craft that I'm working on! This craft is a cute little teddy bear!

Been working on it during my extra time the last few days & it looks pretty good so far. Normally, whenever I'm trying to cut out a specific shape in the felt, I draw a template, cut it out, put it on top of the felt, and cut around it. Well, the last few days I haven't been able to draw a perfect teddy bear shape. Instead this time, I searched for photos of teddy bear cookies, found the perfect one, and printed it out.

After printing out the photo of a teddy bear cookie, I cut out the photo and used it to help get the perfect teddy bear felt shape. Once I had two teddy bear shaped pieces of brown felt, I started sewing!

At the moment, I'm working on the teddy bear's face & stuffing the bear. Hoping to finish it within a few days!

I hope you like it so far!


Tuesday, February 13, 2018

Hershey's Kisses Inspired Decorative Foil Chocolates + Tutorial

Hello crafters!

Valentine's Day is tomorrow & one of my favorite things about Valentine's is the delicious chocolate! Since I've been working with a lot of foil lately,  I decided to try using the foil to make a fake, Hershey's Kisses inspired chocolate!

It turned out pretty good & it is sugar-free. Just remember that these fake chocolates are not edible for people or dolls!

 Photo of this chocolates-made-out-of-foil shown below!↓
Want to make adorable Hershey's Kisses inspired fake chocolates like these? Here is a tutorial showing how to make them!

You'll Need:
A square piece of silver foil
A pebble (or something with a flat, hard bottom)
Scissors
Paper
Glue

1.
First, put the flat-bottom pebble in the middle of the piece of foil.

2.
Next, start folding the foil with the pebble inside. Keep folding until it starts to look like a Hershey's Kisses shape.


3.
Cut off the extra foil.


4.
Try folding the leftover foil to make it slightly curved.

5.
Trim the foil.


6.
Get a small piece of paper, cut it smaller if needed. Then, add some glue between a piece of foil on the top of your fake foil chocolate and stick the piece of paper inside. You can even write a note on the piece of paper!


It's finally finished!


I hope you liked these adorable fake chocolates & tutorial! 


Sunday, February 11, 2018

CCK Miniature Corn Muffin Mix + Template

Hello crafters!

In my last few posts, I have mentioned a bit about working on some mini food box templates. After hours and hours of work, some of the templates are finally finished!

Do you enjoy corn muffins? If so,  your dolls might too! Last night I finished creating a brand new, CrazyCraftyKitty original, "Kitty" corn muffin mix template! After working on this template for a few weeks, I'm really happy with the final design! The hardest part of making this was getting the sizes perfect.

This is how the box looks once folded together:


If you would like to make this corn muffin mix too, here is the link to the template that I created: https://docs.google.com/document/d/1RpYFUjP02hVajz4tPjgIwaaW6-Wlv7rb7pO1Jyx2K6c/edit?usp=drivesdk

The corn muffin mix box size is perfect for Barbie dolls or any other 1:6 scale dolls. Once you print out the template, use scissors to cut it out & then fold the template on the lines.

Working on many more templates that I'll be posting soon! What do you think of these CCK freebie mini templates so far?  Let me know in the comments!:)

Anyways, I hope you like it!


Miniature WIP Alligator

Hello crafters!

This morning, I'm super excited to finally post a new craft that I'm in the middle of working on.  One of the crafts that I'm working on is . . .

A miniature alligator! Never thought I would actually be trying to make one since there are so many details needed. I'm actually pretty impressed by it so far.

To make it, I used white air-dry clay to just easily shape the alligator face, mouth, body, and tail. Made the legs separate & had glued them on. Alligator tail accidentally broke a few times, but no worries! I glued the tailback every time & it healed!

Although rare, white alligators exist, I decided to make & paint it as a green alligator. Once the clay was dry, I painted it with one coat of green sun catcher paint. Next, I tried drawing on the back of the mini alligator with a marker & then re-coated the alligator with more sun catcher paint.

Not finished yet, still have a lot to finish on it including eyes, teeth details, and other extra details. Might also try making a habitat for it.

Well, I hope you like this beautiful alligator so far!


Friday, February 9, 2018

White Chocolate Heart Cake With Dark Chocolate Frosting

Hello crafters!

Valentine's Day is coming soon! Which also means it's time to finally start making & posting Valentine's Day inspired minis!

At the moment, I'm working on many new & free Valentine's Day templates (which will soon be posted). A few of these templates are planned to be miniature Valentine's Day cards, letters, and more! I can't wait to post them! But for now, I'm super excited to introduce another new member of the CCK miniature family! Let's welcome, White Chocolate, Dark Chocolate Frosting Heart Cake!

I actually just made this cake a few days ago. Had made it using white air dry clay. As much as I love air-dry clay, there are some drawbacks whenever you forget how fast it can dry & harden, such as: forgetting to flake a cake. That's actually what happened with this cake! Was making a few other cakes at the same time & by the time I realized that it wasn't flaked, it had already been a few days late. Lets just assume it's a creamy-white-chocolate icing filled cake.

It was pretty easy to make. Made the cake into a heart from using a mold. Whenever I took the white clay out of the mold, I cut out the cake slice and frosted the outside with a delicious chocolate color. Finally, I sprinkled a few chocolate sprinkles on top!

I hope you like it!