Tuesday, May 23, 2017

Cheese Enchiladas!

I'm excited to share this yummy miniature food I made a few days ago, some cheese enchiladas! Basically a rolled tortilla with cheese inside but instead, this one is not eatable!


It was one of the most easiest mini foods to make. Here is how I made it:
1. Get a small flat rectangle or square piece of beige clay and a piece of orange clay about the length of the beige clay, with the width much smaller than the beige clay.
2. Put the piece of orange clay in the middle of the beige clay.
3. Fold both sides of the beige clay.
4. Use chalk to make the burned look.
5. Lastly, use scissors to cut both ends of the enchiladas. Cutting both sides will then make the inside appearence look like the cheese is coming out.

I hope you like it!

Descendants Craft

I've decided to share here a really special craft inspired by the Disney movie Descendants! It is personally my all-time favorite craft that I have made so far, which also got featured on Crafty Amino after I entered it for the #magicalcrafts weekend. It has seemed like the perfect entry since nothig is more magical than Disney villians!

 In this craft I made a little table to hold the few items I made representing Disney villians. (picture below)
w

In the back you can see a yellow and blue crown to represent Ben, son of Belle & the Beast (from Beauty and the Beast). Right in front of the crown I created a red poison apple to represent Evie (daughter of the Evil Queen from Snow White).


In the left corner there is a green sign with a shape of Malificent (from Sleeping Beauty) with the words "Long Live Evil" painted on it to represent Mal, Malificent's daughter.


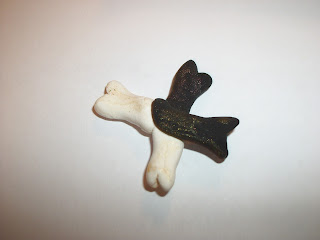
In the right corner there are two bones crossed, each half black & half white to represent Carlos (son of Cruella De Vill from 101 Dalmations).


Lastly I created a golden cobra to represent Jay (son of Jafar from Aladdin).


I hope you like it!

Mini Minnie Mouse

In this post i've decided to share one on my favorite and most amazing projects that i've made. It's a miniature version of Disney's minnie mouse! Or as I like to call it, Mini Minnie Mouse!
Here is a picture of it:


I think I looks pretty good. It took a few hours to shape her shoes, hands, and dress. The hardest part was doing her face. She is fully made out of air-dry clay except for the tooth-picks I used inside. A trick I used to keep her standing up and able to stand by herself is I put a tooth-pick in her arms, dress, legs and heels. It made it much easier so her head wasn't too heavy. I have a picture of how her arm actually looked when I was creative it below!


As you can see above, I used black clay to make the arm and white clay to make the glove on her hand. I used a tooth-pick to make the prints in the glove to look like fingers. Finally , I put a cut tooth-pick in the middle.

The whole minnie mouse figure is about 3 and 1/2 inches. I hope you like it!


Chips & Dip

In this post I decided to share some more mini food! Here with us in this post are some chips and dip I created a few weeks ago using air-dry clay! A picture of it is below! I also made the bowls and tray.
The easiest part about making the chips and dip was making the chips. It seems harder than it is, but all you need is to cut out one flat triangle of the color clay you have chose to use. Then just fold a few parts or ends of the triangle to make it look like a the shape of a chip!

I made the bowl of melted cheese dip with a special mixture of clay, chalk, and water. First, I got a small cup with less than a teaspoon of water. Next, I flaked off some yellow and orange chalk to put in the water. Then, I put the yellow clay in the water & chalk and mixed it until all of it was mixed together. Finally, I put the dip inside the bowl!

WARNING: Not eatable!

What do you think of this chips & dip?

Monday, May 22, 2017

Burgers!

A few days ago I tried making some new burgers after I had made some burgers a few weeks ago. Today I started to compare the three new burgers I made to the two old burders I made awhile ago. In my opinion, the old burgers look more realistic. What do you think?

My First Burgers

OR

My Second (newest) Burgers
Which do you like best?


Leopard & Habitat Out Of Clay

For one of my first posts on this blog I decided to share one of my favorite crafts. The craft I decided to share is my leopard I made along with a habitat for it. Here is a picture of it:
It was really fun and easy to make and didn't take much time. I had made it specifically for Crafty Amino's #IntoTheWildCrafts weekend, so I had less than 3 days to finish it.

All of it was made with air-dry clay. To make the green grass under the leopard I used sand paper. Then if you look closely at the brown log I made in the background, I got the texture by using a tooth-pick and slightly used it to make the texture and look of a real log.


I hope you like it!